
Uncategorized
Buy magic mushroom for sale online.
WHY GROW YOUR OWN MUSHROOMS?
Buy magic mushroom for sale online. Psychedelics, like LSD and psilocybin, were some of the first medicines I could actually feel good about taking, even if the law of the state had long criminalized them and denied their mental health benefits. Buy magic mushroom for sale online.
Still, I always bought them secondhand. But recently, Third Wave’s Mushroom Grow Kit put the cultivation of psilocybin within reach for an amateur like me. Buy magic mushroom for sale online.
Sure, the information and resources to grow my own mushrooms may have already been scattered across the internet, just waiting for me to put the pieces together. But this mushroom kit did all the hard work for me, giving me almost all the tools I needed to grow magic mushrooms, including straightforward and digestible guidance without which I may have given up on the process. Buy magic mushroom for sale online.
Now, I have almost (but not quite) more mushrooms than I know what to do with, and have started an ongoing microdosing regimen to better integrate the wisdom and self-expression psilocybin mushrooms can unlock into my everyday life. Buy magic mushroom for sale online.
Below, I’ll go step by step through how Third Wave’s instructions corresponded to my experience as a first-time shroom cultivator, so other beginners can have a better idea of what to expect ordering the kit and hopefully learn from a few of my mistakes.
MAGIC MUSHROOM PREPARATION
With my mushroom grow kit in the mail, the first thing I had to do was buy spores to inoculate it. Referencing Third Wave’s articles on buying spores and other online forums’ recommendations for the easiest psilocybe cubensis species of mushrooms to grow, I purchased B+ and Treasure Coast spore syringes from Premium Spores. These varieties combined my priorities of low cost and ease of cultivation.
Despite my research, the breadth of options of spore sellers and mushroom species was still overwhelming, so at a certain point it was just a matter of committing to the purchase, though I didn’t quite know what I would be getting into, or how much of a difference the decision would even make.
UNPACKING THE KIT
In early February 2022, I received my kit in the mail, along with login info to access the online tutorial that would guide my incubation. Sure enough, I had all the materials noted in the online instructions of Third Wave’s mushroom Grow Kit course.
At first, I was struck by how many materials there were, but in retrospect, this was the first of many teachable moments in my experiences as a psychedelic mushroom grower. What seemed like a lot to unpack at first all eventually came in handy over time and coalesced piece-by-piece into a worthwhile product.
The only provided material in the grow kit I ended up not using was the 100-watt light bulb—more on that later. I also didn’t end up buying or needing any of the extra items the instructions encouraged me to consider. Let that be another lesson to those who follow my footsteps: don’t jump the gun thinking you need to buy everything right at the outset.
Per the instructions, I stowed my compost in the freezer while my excess spores found a home in a back corner of my fridge.
INOCULATION OF MAGIC MUSHROOMS
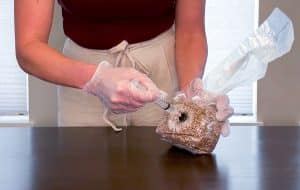
On Valentine’s Day, I injected the spore solutions into the two vermiculite grain mushroom spawn bags, following the video instructions included in my Third Wave online account. I overshot the measurements of 3 cubic centimeters just slightly, sterilizing the needle with rubbing alcohol wipes between injections.
I did my best to keep the grain spawn chambers sterile but must admit I often fell short in my efforts to prevent contamination, since I would switch back and forth between doing the steps and scrolling through instruction videos to compare and keep on track. I’d recommend others take the time to watch and rewatch the video maybe a day ahead, so you know how to do the steps before executing them.
Thankfully, my not-all-that-sanitary procedures didn’t muck up the colonization of the grain mushroom spawn bags. After inoculating the grain spawn bags, I stored them inside an empty filing cabinet that met the mycelium’s need for darkness and limited airflow. The temperature in this still-air environment was about 70°F, which was below the recommended temperature of 77° to 80°.
Then, as is often required during this growing process, I played the waiting game. Rather than the prescribed two weeks, for me it took just shy of two months for the mushroom mycelium to colonize 75% of the bag, as indicated by the white rootlets spreading throughout the beige grain. (I later learned this was because of the low temperature. The colder the temperature, the slower the process of mycelium growth).
At this point I broke up the grain and waited another week for the mycelium to finish spreading throughout the grain. I worried many times during this delay that I might have done something wrong, but a little faith and patience proved to be virtues here, as they would again and again.
COLONIZATION OF MAGIC MUSHROOMS
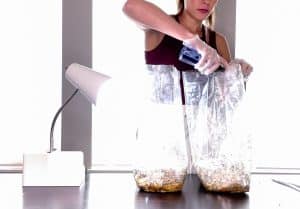
First, I thawed out the compost bag and sterilized my workspace and vinyl gloves once more. After all that waiting (truly the hardest part, as Tom Petty can attest), mixing the compost and fully colonized grain into the micropore tape-patched mycobags was straightforward and reassuring to my sense of progress.
The only part of this multi-step process that really took some doing was getting used to clamping the newly-filled mycobags shut with the vinyl tubing. I even tore a hole in one of the bags while sealing and unsealing it, so I had to clamp it a little lower than I might have liked, at the top edge of the filter.
Finally, I placed the mycobags back in my empty storage cabinet and left them untouched. Again, the temperature I stored them at was lower than recommended, but thankfully the only consequence I suffered from this seemed to be a slower fruiting process. Within a few days I started seeing pinning (small growth peeking through), and in about 10 days, the substrate was completely colonized with mycelium.
FRUITING MAGIC MUSHROOMS
In this third stage of the mushroom cultivation process, the aim is to create the optimal conditions for my mushrooms to fruit. To make that happen, as per the Third Wave Mushroom Grow Kit instructions, I introduced a scheduled light cycle and mist sprayed my mushrooms with spring water.
For the 12/12 light schedule, I used a sun lamp, which I kept with the fully colonized bulk mushroom substrate mycobags in the corner of a room in my home that doesn’t get much light or foot traffic. I set morning and nightly alarms to help me maintain the schedule, but there were still times when I left the mycobags exposed for longer and shorter periods than instructed.
When it came to airing out and misting the substrate, I was also relatively hands-off. The colonized substrate never seemed to get too wet or too dry, so I didn’t have to pour off any excess liquid and only occasionally watered them with the mist bottle included in the grow kit. This may have been the effect of the humid spring climate my region was experiencing, but whatever the reason, the mushrooms seemed mostly to take care of their own humidity.
Even when I didn’t mist for long periods of time, I continued to fan out the bags every day that I remembered. In hindsight, I might have paid more attention to the mushrooms, making more of an intentional and ritualistic practice of caring for them, rather than intermittently neglecting their maintenance. But, it was my first growing attempt; lessons learned for next time.
Regardless, within two weeks I started to see little white pins (which I learned are called primordia) pushing up through the substrate. Several days later, I was thrilled to see the pins of little button mushrooms starting to develop like phallic brown aliens emerging from the webbed soil.
HARVESTING OF MAGIC MUSHROOMS
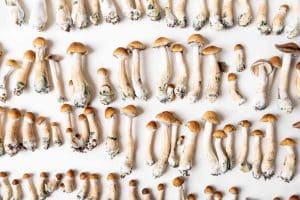
On May 12th, I harvested my first flush of roughly half a dozen B+ Psilocybe cubensis mushrooms, 11 days after the first signs of pinning and almost 3 months since incubation. On several of the specimens, the mushroom veils had already broken and the caps started to flatten to spread their spores.
In my excitement to finally reap the fruits of this labor, at times I neglected to take all the sterilization procedures into account, reaching in with ungloved hands to twist and clean off the shrooms from their compost bed.
I’ve been pleasantly surprised at how consistently and continuously both grain substrates continued to produce. About three months after the first “flush” (each crop or harvest of mushrooms), my mushrooms started to slow down in their production, while I’ve eased off on spraying and maintaining the light schedule in favor of keeping them near a window with direct sunlight. Mainly, I’ve just continued to air out the bags and check for new harvests on a semi-daily basis. In one bag, some yellowish discoloration has appeared amidst the white mycelium, which tells me all my laxity around sterilization may have finally introduced some unfriendly bacteria to the substrate.
Shortly after, I removed the myceliated soil from its plastic mycobags into some neighboring soil beds. Since these spores have already served me so well, it’s my hope they’ll continue to spread and produce more mind-opening gifts for others to enjoy out in nature. If there’s anything psilocybin can be counted on for, it’s resilience and versatility as a welcome but incognito fixture enriching even impoverished ecological environments.
INGESTION AND STORAGE OF MAGIC MUSHROOMS
In growing my own medicine, as in making my own food, I can hardly resist sampling the products as soon as they’re ready. In this case, on a Sunday morning, I impulsively took my first microdose of a single mushroom while checking the dryness of my first flush.
The experience evolved into something of a talk therapy session at home with my partner, sorting through some emotional baggage as I could feel my neural capacities making new connections, just like mycelium weaving underground. I know there’s no hope of concentrating such a meaningful experience into text, but I feel obliged to try with a few lines of psychedelically-inspired poetry:
The tree of knowledge is underground
In the waste of your tastes it’s forbidden fruits found;
Activated by scratch and sniff
Lean a little lower and take a whiff.
Remembering what I’ve forgotten
There’s no such thing as a higher reality
Only planes of it higher than we can see.
You wanted and waited for your commander in chief
Now may time present to you,
The shamanic priest.
Our missing link locked away as evidence
For a case you’ll never try.
One of these floods will break the door down
And take us all out to see.
You’ll never take your medicine
If you can’t believe in the cure.
Now, where was I?
Oh yeah—here. To preserve the mushrooms, I used my air fryer on the dehydrator setting at 105°F. Each batch took roughly 12 hours to shrivel up bone-dry enough to be stored safely without molding. Some shrooms I left whole and some I ground into a powder in order to measure out more precisely for microdosing purposes.
One piece of equipment not included in this kit that I’d heartily recommend for anyone else planning to grow their own mushrooms: a microgram scale to portion out doses. I’ve also taken to the habit of saving pill capsules from ordinary vitamin supplements and repurposing them to hold prepared microdoses on the go.
With my mushroom inventory accruing, I look forward to experimenting with more forms of ingestion, like lemon tekking and combining it with other adaptogenic herbs, to keep exploring the depths of psychedelics and unlocking the potential of this collaboration between man and mushroom.
CONCLUSION
Looking back, learning to grow psilocybin mushrooms according to Third Wave’s Mushroom Grow Kit course instructions on how to grow mushrooms indoors seemed straightforward enough, but while going through it, there was plenty of room for trial and confusion. This is true for any first-time DIY creative process, I’ve found.
There were a lot of unexpected delays in contrast to the instructions, which made me question if I was doing something wrong or had upset the process somehow by some minor carelessness. I later learned that it was due to the temperature. Thankfully, in the end, everything turned out for the best, and the mushrooms took the time they needed to grow in spite of whatever rush or expectations my ego put around them.
After so much uncertainty about mushroom cultivation and mycology, I was ecstatic once they began fruiting and thus perhaps a bit overeager in consuming them. Though the experiences that grew out of my substrate have been truly priceless, I’d recommend others take the time that I didn’t initially to understand dosages and integration procedures before sampling their homegrown psilocybin. It’s great to do things yourself, but you also want to do them mindfully. If you want more guidance for your microdosing journey, you can check out Third Wave’s Microdosing Course.
The lessons of this process have been invaluable, which means I can only encourage others interested in natural medicines and the task of self-exploration to take advantage of this reasonably priced opportunity and intuitive online guidance.
Thanks for reading and happy mushroom growing!
Want to easily grow mushrooms at home?
Third Wave’s How to Grow Mushrooms Course and Grow Kit turn the daunting task of cultivating mushrooms into a simple one.
Our in depth guide and step-by-step videos will have you harvesting your own home-grown mushrooms in no time.